
Millenium Falcon |
| By Sean Greenplate |
|
|
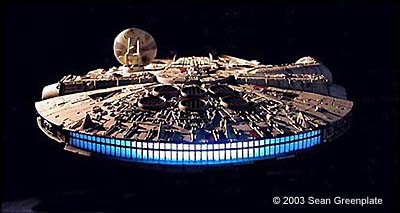
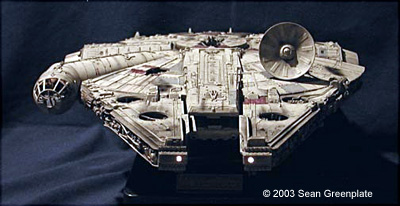
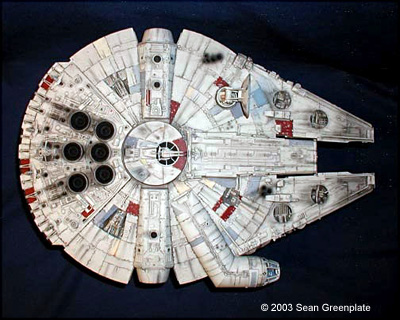
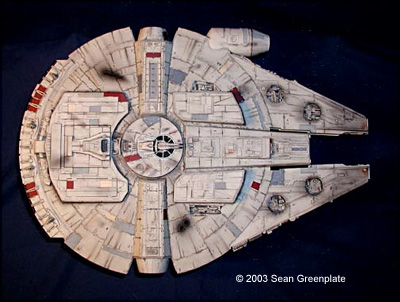
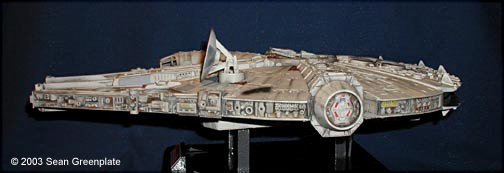
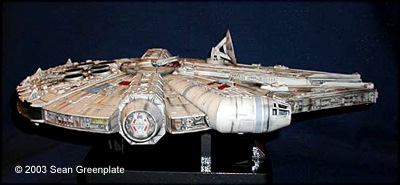
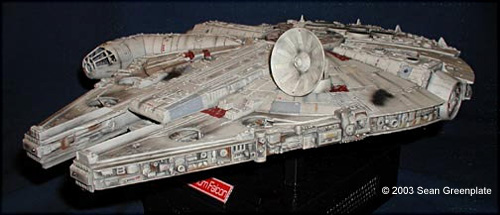
This is the old MPC kit of the Millennium Falcon. As you all know by now the upper and lower hulls are detailed pretty accurately. But the side panels and cockpit are horrible. That's where Jack Smith at Falcon Kits comes in. His kit made my Falcon look as close to the real studio model as it possibly could. The kit only takes a few modifications to make it all fit good, and that is the shortening of the pins that join the upper and lower hulls together. After studying pictures of the studio model, I chose Camouflage Gray as the base color. This is a very light gray and I thought it matched pretty well with the pictures I looked at. After the lower hull cleaned up and the new landing gear bays glued in place I sanded it down I gave it a coat of primer to give the final coat a better adhesion. I then finished the lower hull and gave it the different color panels where needed. I also added the weathering and oil and rust streaks that I saw on the ILM model. This was the point that I decided to light the model. I chose a mini florescent light that I found at Home Depot for the main engines. And I chose three mini MAG LITE light bulbs for the cockpit and front floodlights. I used a 9 prong male/female plug that I mounted just behind the bottom gun turret. I inclosed the florescent light with thin pieces of wood lined with aluminum foil to reflect the light towards the rear and not throughout the model itself. As for the mini MAG LITE bulbs, I just drilled a hole in each of the pieces that go on the very front of the model and glued in the bulbs. For the cockpit I notched out a hole in the top of the back panel for the bulb to fit through and glued it in place. For the top hull I added alot of detail to the rear deck and along the middle of the upper hull. I then sanded it down and drilled out the six exhaust grills so that I can glue in the new photo etched ones that came with the Falcon Kits set. After I primed and painted the upper hull I painted the various panels there appropriate colors. |
|
I then decided to add
detail under the grills that I glued in. I took some wheels from a B1B
Bomber, mounted them to a thin piece of wood, painted it flat black and
glued it underneath the photo etched grills. I then added the weathering and
oil and rust streaks.
Now that most of the hard stuff was done I painted and weathered all the side panels. I then glued the upper and lower hulls together and glued the side panels in place. For the docking rings I added panel lines to them with a pencil and small ruler just to add more detail. After all the finishing touches were done I gave the entire model a few thin coats of Dull Coat to seal everything. For the stand I found a small serving tray at a craft store and some square dowels. I cut the dowels down and screwed them in place. I then cut the holes for the two switches and glued in a piece for the name plate to mount on. I painted this with a paint called Rust-Oleum Hammered Black. This has a good durable finish and looks pretty cool too. I then soldered all the wires and battery cases. I popped in the batteries, hooked up the plug from the stand to the model and turned on the switches. I couldn't believe it but it all worked the first time. Though my pictures don't do this model justice. this is by far the best model I've built yet. And a big thanks to Jack Smith for his detail kit which made the kit look as accurate to the ILM models as possible. Image: Top view Image: Underneath Image: Rear deck Image: Left side Image: Right side Image: Front/left Image: front view |
|

