
USS Bismark |
| By April Wells |
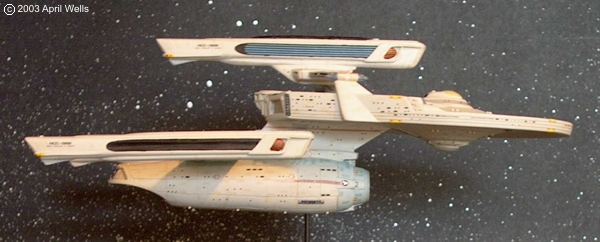 Here are the pictures of my recent kitbash using two Starcraft models. She is the USS Bismark, a Bismark-class dreadnought. She has two full size warp cores, one in the primary hull, the other in the secondary hull. The Primary Hull Core is used in standard operations to power the weapons and shields only. The Secondary Hull Core is used to power the rest of the ship (life support, computer systems, transporters, tractor beams, etc.). In an emergency when one of the cores is damaged or ejected the other core will be rerouted to power the entire ship, including propulsion, in a matter of 5 minutes. If one, or both, of the Secondary Hull nacelles are damaged or ejected, the nacelle on the Primary hull can be used to propel the vessel. (though at greatly reduced speed and efficiency). Though the Upper Nacelle can be used to propel the entire vessel, weighing around 200,000 metric tons, at Warp 3.5 sustained (with emergency warp speed of 4.0 for 5 minutes), it is very inefficient. In the event of a catastrophic loss of the Secondary Hull, the Primary Hull is capable of traveling at Warp 6 sustained (emergency speed of Warp 7 for 5 minutes). She also carries 18 star-fighters. Sixteen of these are used at a time. The two additional are for back-up in case two of the fighters are in repairs (or destroyed). Building her was a pain only in making things that don't go together, fit. Painting her though was interesting. I wanted to get the hull panel look, but I also wanted to include the Engineering Blue hull panels. There are between 250-300 individual hull panels, each masked over the base coat of Testors Acrylic Camoflauge Gray. Each piece of tape is about 2mm x 5mm in size. Once the hull masking was in place I airbrushed her with Testors Acrylic Light Gray. Once the paint was dry enough (about ten minutes) I removed the masking and allowed it to dry completely. For the Engineering Blue I used Tamiya Sky Blue. Then masking over areas with the small tape pieces, I sprayed the entire model Acrylic Light Gray to blend everything together and lighten the blue. I then took the masking off and sprayed the Light Gray again to mute the darker panels slightly. On the slightly depressed areas above the shuttlebay doors, I sprayed Testors Enamel Intermediate Blue (believe it or not. Just make certain that the acrylic coat has dried for three or four days MINIMUM, or else the enamel will eat off the acrylic and you'll be left with a gooey mess that you'll have to start the paint job all over again). The decals were a special order from JTGraphics. I needed both Miranda-class and Constitution II-class decals to have the name and hull number. Plus I needed a larger number of Botanical Garden windows. A Constitution-class has 6 windows. The Bismark has 8. I also needed more windows for the secondary hull so he gave me a few extra secondary hull windows. The phasers are made from Evergreen plastic rod. I don't recall the exact dimensions, but their width is a little less than the width of the yellow rectangles. The phasers are supposed to fit inside the warning areas. You can fit about 3 within the yellow area with the correct width of rod (obviously you only want to use 2....) The first thing you need to do is complete the model. Build it, paint it, decal it (including the phaser rectangles), and seal it with Dull Coat. Once you have done that, then you do the phaser bumps. When you get the correct width of rod, use a file or medium grit sandpaper, and round the tip of it. Once you have done that, take your knife and gently cut off the tip (a good gauge that I use is to cut just below the base of the rounded area, that way it looks like a hemisphere). For myself, I make all of the phasers at once and place them, flat side down, onto folded drafting tape or in a small container (a lid from a used, or empty, spray paint can). Once I have the number of phasers that I need I then airbrush them Light Gray. If you don't have an airbrush you can use a spray can of Camouflage Gray, it's pretty close to Lt. Gray. After the pain has dried, peel the phaser bumps off and then take a dab of Zap-a-gap (or similar glue) and glue it on. After you have placed all of the phasers, and the glue is completely dry, spray another coat of Dull Coat. Once the Dull Coat is dry I use a Sharpie Ultra Fine Point Permanent Marker to place a dot for the phaser emitter point (you may have to dab a few times to ensure that you've gotten it on. Just be careful). WARNING!! DO NOT use the marker BEFORE the clear coat. The ink will bleed, even after 2 days of drying. I am very proud of how it came out. I had been putting off building her for various reasons for about 13 years. Now she is done and I am glad that I finally did. Image: Bow on from beneath Image: Aft Image: Dorsal view Image: Ventral view Image: The bridge Image: Engineering forward and neck Image: The boat bays Image: Front view Image: Side by Side Image: Romulans Off Every Quarter! |